![[Week 2] rails new budgetyourtime](https://cdn.hashnode.com/res/hashnode/image/unsplash/1SsUquHPNT8/upload/v1641134194675/7IGSQNsPtH.jpeg?w=1600&h=840&fit=crop&crop=entropy&auto=compress,format&format=webp)


Introduction
In the last blog I shared about the foundations I am using to get my app up and running without even having the app yet. So, this week I am going to share with you things that I have learned while starting a new project from scratch. The goals for this week are to:
- Setup a new Ruby on Rails 7 app with Tailwindcss
- Get Tailkit working with the app
- Setup Devise for authentication
PS: This is not a step by step guide but a summary of what I have learned or things that I find interesting. Of course, I will be sharing the resources that I find useful as well.
rails new
I have always wanted to try the HOTWIRE way of doing front end with Rails but never really got the chance. At work, we are using Rails 6 for the backend and React for the front-end, so I have never really built an app the "Rails way". The time seems perfect now, with the release of Rails 7, Rails now has HOTWIRE as the default and make working with tailwindcss super easy. All I have to do was:
rails new budget-your-time --css tailwind --database postgresql
Voila, my app now has HOTWIRE enabled by default. There are a lot of new things happening in Rails 7, for example, it now uses import maps by default to handle JavaScript modules. I have not dived deep into how it works, but I will love to as I go along.
Tailkit
A special shout-out to Nick Janetakis, I won a Tailkit license in a giveaway in one of his videos. This is my first time using pre-build UI components to build a website, at work, I was mainly using design libraries to build the UI. The setup was pretty easy, all I have to do was to:
- Install tailwindcss
- Install some of the tailwindcss plugins that Tailkit is using
- Modify the
tailwind.config.jswith the config provided - Add alpine CDN through Rails importmap to use Alpine JS-based components
Devise
Devise gem is pretty well-known in the Rails community for authentication. I have heard a lot of good things about it, but this was my first time using it myself. The README guide is well documented but I do find myself googling here and there to get everything up and running as I intended.
PS: Do check out their wiki too.
Here are a few things that I like about devise:
It abstracts out the whole authentication flow from the code base, this can be good and bad, if you don't know what devise is doing under the hood, things can feel like magic and you do not want that. For Rails beginners, it is recommended to go through tutorials that teach you how to build a simple authentication system from scratch. For example, you should learn about things like how
Remember meworks to keep the users signed in even after they close their browsers session and etc. I personally got started with Michael Hartl's online book and I found it very helpful.It is very customizable. Devise gives you 10 modules out of the box and you can mix and match on how you want to set it up. For example, you could add
Rememberable moduleand devise will do the job in keeping the users signed in (if they have it checked) even after they close their browsers.I now have a full-fledged authentication system, where users can sign up, receive emails for confirmation, reset their password if they lost it, sign in with the remember me checkbox option, and signing out. All of these are done by devise!
Tips and tricks that might be helpful when you are trying to set up devise from scratch
1. Get devise to work with Turbo
The latest devise supports Rails 7 but it doesn't fully support Turbo yet. You have to tweak the devise config file to get it to work. I got it working by following this video by Chris Oliver. In short, here are the codes that are needed, for explanations on why you need them, Chris did a great job in explaining them in his video.
# config/initializers/devise.rb
Rails.application.reloader.to_prepare do
  class TurboController < ApplicationController
    class Responder < ActionController::Responder
      def to_turbo_stream
        controller.render(options.merge(formats: :html))
      rescue ActionView::MissingTemplate => error
        if get?
          raise error
        elsif has_errors? && default_action
          render(rendering_options.merge(formats: :html, status: :unprocessable_entity))
        else
          redirect_to(navigation_location)
        end
      end
    end

    self.responder = Responder
    respond_to :html, :turbo_stream
  end
end

class TurboFailureApp < Devise::FailureApp
  def respond
    if request_format == :turbo_stream
      redirect
    else
      super
    end
  end

  def skip_format?
    ["html", "turbo_stream", "*/*"].include?(request_format.to_s)
  end
end

Devise.setup do |config|
  ...
  config.parent_controller = "TurboController"
  ...
  config.navigational_formats = ["*/*", :html, :turbo_stream]
  ...
  config.warden do |manager|
    manager.failure_app = TurboFailureApp
  end
  ...
end
2. Redirect user to a custom page after a successful sign-up
My use case here is that I included the Confirmable module which means that after a user signs up, an email will be sent to the user to confirm their email address. By default, devise will redirect the user back to the root path (landing page) after a successful signup. This is not ideal, and I want to redirect the user to a welcome screen with a flash banner that tells them that an email has been sent to their email address for confirmation. Below were the steps that I had taken to achieve the above:
# Generates app/controllers/users/registrations_controller.rb
rails g devise:controllers users -c=registration
# app/controllers/users/registrations_controller.rb
class Users::RegistrationsController < Devise::RegistrationsController
  protected

  # This is where it overrides the redirection
  def after_inactive_sign_up_path_for(resource)
    your_custom_path
  end
end
# config/routes.rb
Rails.application.routes.draw do
  # Doing this so that it will pick up
  # whatever we have override above
  devise_for :users,
    controllers: {
      registrations: "users/registrations"
    }
end
3. Define a different root route for authenticated and unauthenticated users
When a user that has already signed in visits your page, they should be redirected to maybe the user's profile page while unauthenticated users should be redirected to the landing page. To do this with devise:
# config/routes.rb
Rails.application.routes.draw do
  unauthenticated do
    root to: "static_pages#home"
  end

  authenticated :user do
    root "users#show", as: :authenticated_root
  end
end
4. Customizing the view
When you install devise, it generates default views for all your sign in, sign up actions and etc. Those views are literally bare-bones, and you can customize them by running:
# Add all the devise views to your project
rails generate devise:views

# You can now edit the views for example the sign up form in
# app/views/devise/registrations/new.html.erb
5. Adding extra columns for User
When you generate the User model through devise helper like rails generate devise user, it will generate a migration file for you and you should modify it depending on which modules you intend to use. By default, devise only need email and password from the user, but it will be helpful to ask them for their name too, so that we can greet them with their name later on. You can do this by adding it to the migration file like so:
# db/migrate/20211224042014_devise_create_users.rb
  create_table "users", force: :cascade do |t|
    ...
    t.string "name"
    ...
  end
After adding the column, you should add the field in your form for user to submit their name:
# app/views/devise/registrations/new.html.erb
<%= form_for(resource, as: resource_name, url: registration_path(resource_name), html: { }) do |f| %>
    ...
    <%= f.label(:name, "Your Name") %>
    <%= f.text_field(:name) %>
    ...
<% end %>
Finally, you need to add your new columns to the permitted params:
# app/controllers/application_controller.rb
class ApplicationController < ActionController::Base
  before_action :configure_permitted_parameters, if: :devise_controller?

  protected

  def configure_permitted_parameters
    devise_parameter_sanitizer.permit(:sign_up, keys: [:name])
  end
end
6. Modify the minimum password length
When you have the Validatable module included, the default minimum password length is 6, and you can modify it in the devise config file. For example to change the minimum length to 8.
# config/initializers/devise.rb
...
config.password_length = 8..128
...
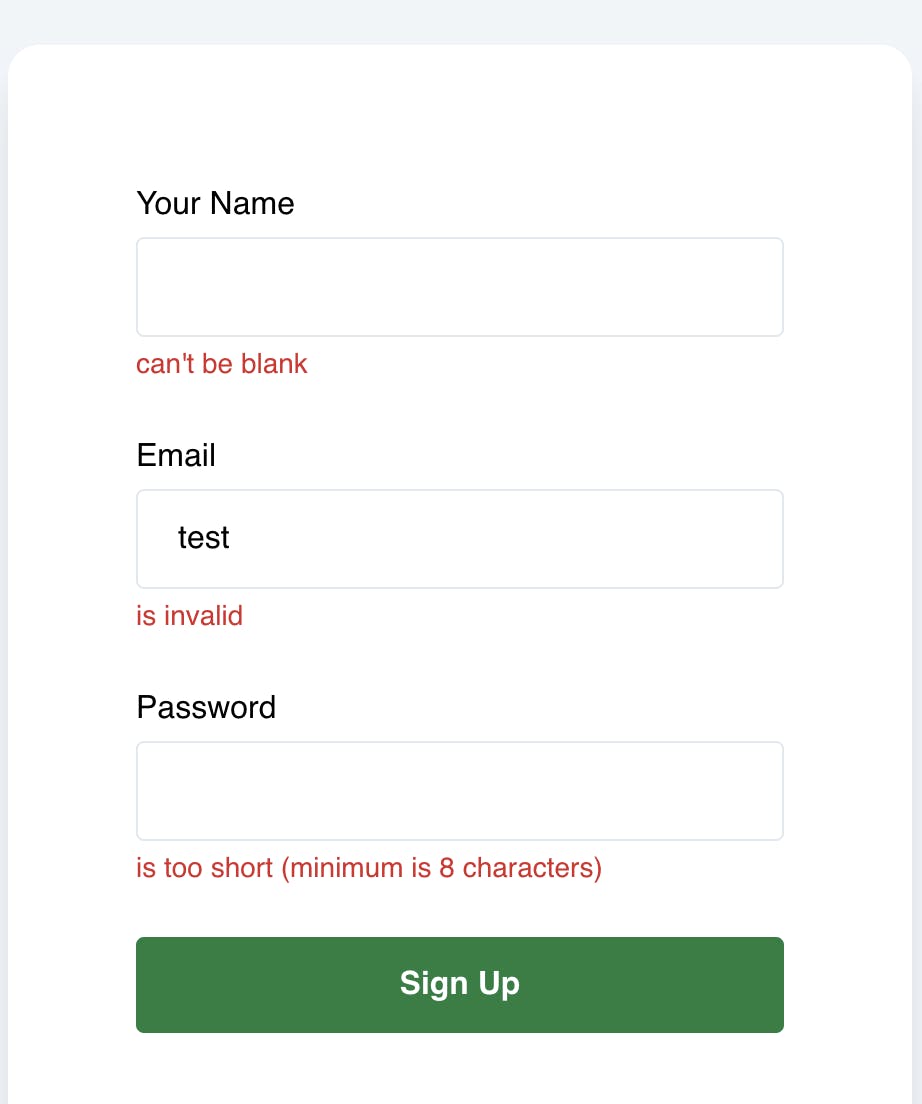
7. Showing inline errors in the form
For invalid form submission, Rails will return you the resource which you can call .errors to build your errors interface. I follow this blog post and managed to get inline errors to work.
# config/initializers/fields_with_errors.rb
ActionView::Base.field_error_proc = proc do |html_tag, instance|
  html_doc = Nokogiri::HTML::DocumentFragment.parse(html_tag, Encoding::UTF_8.to_s)
  element = html_doc.children[0]

  if element
    if ["input", "select", "textarea"].include?(element.name)
      instance.raw(
        %(#{html_doc.to_html}
          <div class="text-sm text-red-600" data-turbo-cache="false">
            #{[*instance.error_message].to_sentence}
          </div>
        )
      )
    else
      instance.raw(html_doc.to_html)
    end
  else
    html_tag
  end
end
New knowledge:
- Using ActionView::Base.field_error_proc to customize how errors are displayed.
- Using .raw method to not escape tags.
- Using
%()frees me from escaping"manually - Using data-turbo-cache to solve the problem of error messages flickering due to the cache.
8. Showing flash in a dismissable flash banner
Devise uses flash[:notice] for messages like a successful sign-in, confirmation email sent and etc. And you can customize how you want to show it to your user. To build a floating dismissable banner showing flash messages, I have a flash partial and a stimulus controller which looks something like this:

# app/views/shared/_flash.html.erb
<% flash.each do |key, value| %>
  <div data-controller="flash" data-turbo-cache="false">
    <%= value %>
    <div class="right-5">
      <button type="button" data-action="flash#dismiss">
        SVG for your cross icon
      </button>
    </div>
  </div>
<% end %>
import { Controller } from "@hotwired/stimulus"

export default class extends Controller {
  connect() {
    setTimeout(() => {
      this.dismiss()
    }, 5000)
  }

  dismiss() {
    this.element.remove()
  }
}
Note that it won't look the same if you just copy and paste it, I have excluded all the tailwindcss classes in the code above. You can check out Stimulus handbook to learn how stimulus work or this blog post for detailed instructions on building a dismissable flash banner.
9. Add a loading button when submitting form
After using React for about 2 years I never imagine myself asking how to make a button load. As I have mentioned before, I mainly use the design library at work to build UI and to make a button load, this is usually all I need:
<Button loading={true}>Submit</Button>
I am surprised that I don't know how to make a button load in Rails, and after some reading, I found this pull request in the Turbo repository. It was an interesting read, and I can now get a loading button like so:

<%= f.button(class: "btn btn-primary group") do %>
  <span class="inline group-disabled:hidden">
    Sign In
  </span>
  <span class="hidden group-disabled:inline">
    <div class="flex">
      <%= render(partial: "components/loading_spinner") %>
      Signing in...
    </div>
  </span>
<% end %>
New knowledge:
- You can use tailwindcss group-{modifier} to style the children based on parent state. As discussed in the pull request, the disabled attribute will be toggled when the form submits, hence we can use the
group-disabledin the children components to achieve a loading button.
Conclusion
That's all for this week, next week I am going to integrate OmniAuth through devise, add integration test and system test for all the flows provided by devise and host the app on Render with both staging and production environments. Thanks for reading, and wishing you a very good day!